Most Common Support Issues
Pay Now / Payment Services
The PayNow option allows you to integrate with Xero’s/Quickbooks Payment Services to allow your customers to pay their invoice online. But not only that, using uCollect’s payment services option your customers can even sign up for the automated collection using selected gateways. The PayNow option is only available on selected gateways (they need to meet certain standards for us to be able to offer this feature). You can search for available gateways here – if you check the “Pay Now” option only those gateways that support the PayNow feature will show up.
There are a few steps that you need to do to get the PayNow option working:
1. Set up your visual identity
Add your logo to the “Organisation Proflile” section of the “Edit Organisation” screen. It is displayed on the Pay Now screen.
- Click Edit Organisation in the menu bar
- In the Organisation Profile section click “Edit Organisation
- In the last entry box click “Choose File” to upload your logo or simply enter a URL where it can be found
- Click the green Submit button
2. Set up Pay Now for the Gateway in uCollect
- From the Edit Organisation menu item, scroll down to the “Payment Gateway” section, and click on the green pencil icon to the right of the gateway.
 (If this section is not displayed then your Gateway is not able to do Pay Now).
 - Activate the “Make Available as a Pay Now option” check box.
- Enter a description for the pay now service – this is what will be displayed to the user if you have multiple options under the heading “pay using”. We suggest that you say “Credit Card” rather than “Stripe” (as your customer will be thinking “I want to pay with my Credit Card” not “Oh – I really want to use Stripe”).
- You may want to set up the new “Calculate Commission/Fees on Settlement” feature while you are here (if your gateway has standard commission structures)
- Choose one of the “Eligible for” options:
- One-off payments only – this option will only be available on the Pay Now screen when “One-off invoice(s)” is selected, and not for “All invoices on their due date…”. This will not be available for Invitations.
- Automatic payments only – this option will only be available on the Pay Now screen when “All invoices on their due date…” is selected, and not “One-off invoice(s)” and for sending as an Invitation.
- One-off and Automatic Payments (default) – available for all Pay Now options and Invites.
- Automatic Payments by Invitation only – this option will not be available for use in Pay Now, but will be eligible to use when sending an invitation.
- Check in the box beside “Send Admin an email when a customer activates a recurring option” if you want to receive an email every time a customer selects the ongoing authority (so that you can send them flowers, or change their branding theme in Xero/Quickbooks to notify them that their account will be charged automatically).
- Click Update.
3. Setup Payment Services in Xero/Quickbooks.
- Log into your Xero/Quickbooks ledger.
- Go to Settings, (General Settings), Invoice Settings
- Click on Payment Services

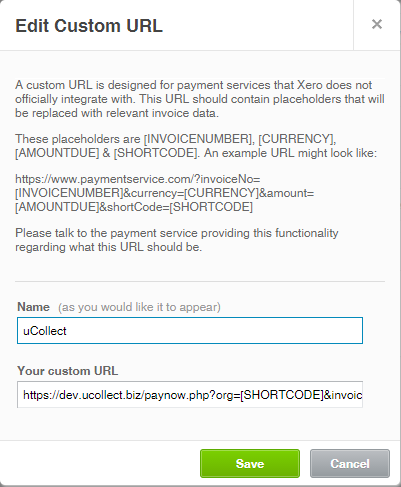
- Click on “+ Add Payment Service” and choose “Custom Payment URL”
- For “Name” enter “uCollect”
- For “Your custom URL” enter “https://app.ucollect.biz/paynow/index/?org=[SHORTCODE]&invoiceNo=[INVOICENUMBER]” (without the quotes – just copy and paste this exactly – it is the same for everybody)
- Click Save

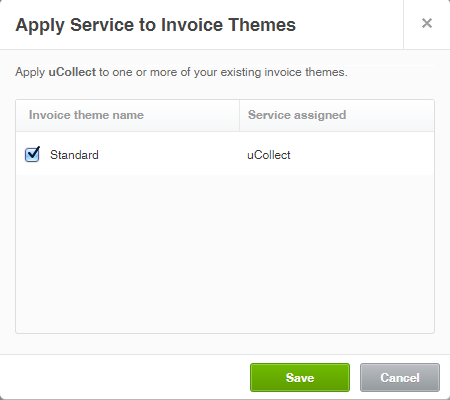
- From the “Edit” menu beside the uCollect entry select “Invoice Themes”
- Check the box beside each Invoice theme that you want this payment service to be available in (each theme can only have one payment service, so selecting it will automatically deactivate any previous service)
- Click Save.
Next time you send out invoices with the online payment link or the PDF attached, your customers will have the option to click through and pay using the uCollect payment gateway(s) you have chosen. Remember, we don’t store their bank account data anywhere – it is all tokenized through your payment gateway (that’s mumbo jumbo for “not storing the credit card number directly) or stored in Xero/Quickbooks (bank accounts for Upload gateways only), so it is completely safe.
4. Set up Xero/Quickbooks “Pre-Authorized” content (optional)
We recommend that you create an Invoice Branding Theme that drives people to sign up. And a second theme that reminds them that they will be charged automatically (Xero/Quickbooks doesn’t let us change the theme remotely so you will have to do this manually).
You can also setup Invoice Email templates to direct people accordingly. For more information on this please see our support page on this topic.
5. Sending Invoices with the Pay Now link
You send invoices direct from Xero/Quickbooks, not from uCollect.
If you have multiple branding themes then you need to ensure that you have assigned an enabled theme to the invoice. If you are using docx branding themes you should ensure that the Pay Now link has been included in your docx template.
You should also ensure that the email message you send includes the Pay Now link as well. You can pre-set these in your Settings, Email Settings templates area.
The Pay Now Screen
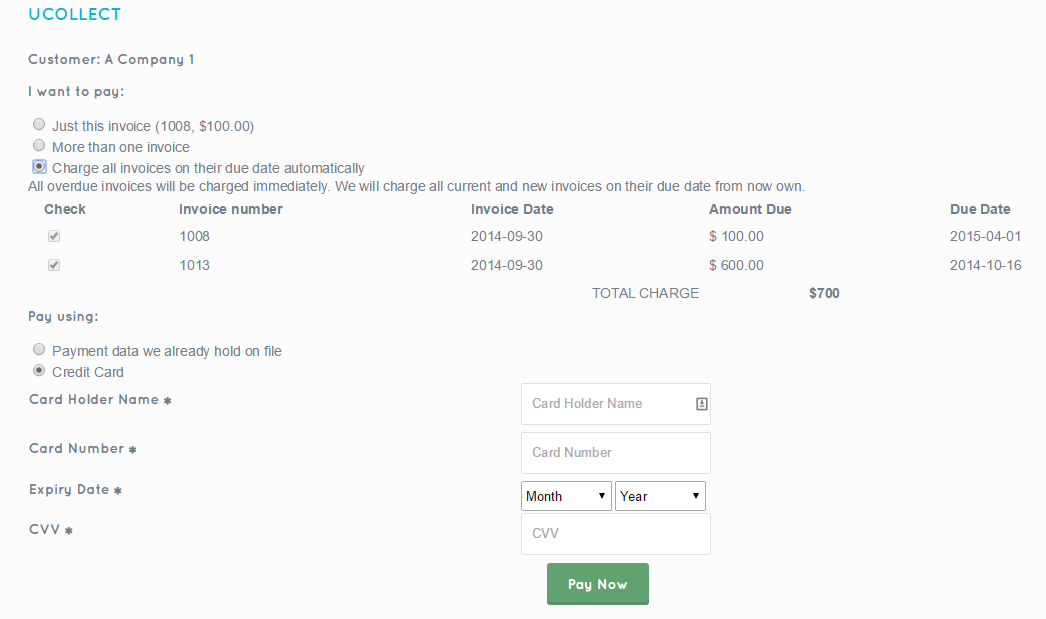
This is the screen that your customer will see when they click through:

The user has the following options (depending on how they access the page):
I want to pay:
- All invoices on their due date automatically: uCollect will show the user the overdue invoices as these will be collected immediately. uCollect will complete the contact profile with the payment details so that future invoices will be automatically collected on the due date. If there is an existing profile in uCollect it will be replaced. If set in the Gateway settings, uCollect will email the Admin users every time a user executes this option. This is the default option. If the contact has invoices that are overdue the system will default to collecting these as well, but the user has the option of suspending this (and providing a comment as to why).
- Just this invoice: the details of the invoice link they clicked through are displayed. They can choose to pay just this one.
- More than one invoice: uCollect will list ALL invoices from Xero/Quickbooks for this contact and they can select which ones to pay.
- One-off invoice(s): uCollect will list ALL invoices from Xero/Quickbooks for this contact and they can select which ones to pay.
Pay Using
uCollect will list all Pay Now enabled gateways eligible for the selected payment option using the description specified in the Payment Gateway profile. If this contact already has a profile in uCollect then they will have the option to select that or create a new payment option. If there is only one option then this will be defaulted.
